Here’s a fun trick you can do somewhat easily with Photoshop. I love the subtlety of this photo manipulation because many people don’t realize it has been taken under the “knife.” In this tutorial, I will teach you how to make your camera disappear and trick your viewers with this optical illusion.
What you’ll need is a camera, a big mirror and a basic knowledge of Photoshop. The theory behind this image is that you’re combining three photos into one. One of each of your hands and a third of your head.
Step One
Holding the camera with your right hand directly in front of your face, place your left fingertips against a mirror. Take a few shots because the framing will be difficult with the camera so close to your face.

Step Two
Keeping the camera ever so steady, switch hands. You should now be holding the camera in front of your face with your left hand, and your right fingertips should be placed against the mirror now. Again, take a couple shots so that you don’t have to try to recreate the setup if something is wrong in one of them.

Step Three
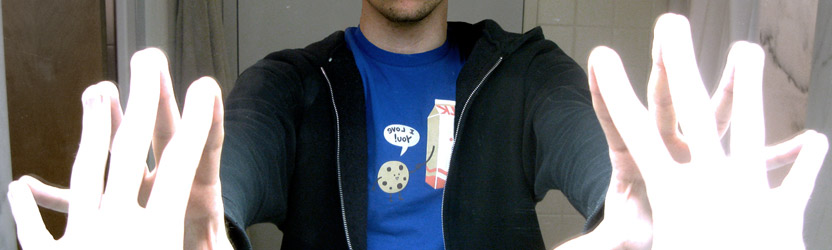
Okay, so we have both of your hands, but how are we going to get your beautiful mug in the composition? Slowly hold the camera with both hands and lower it just below your chin. Angle it slightly upward so that you don’t crop out your forehead or hair. Take a few more pictures and we’re ready to go into the digital dark room. Personally, I like to look right at the camera to possibly convey some sense of deeper meaning (or at least that’s what I tell myself).

Step Four
Load the three photographs that fit the best together into Photoshop and drag them all into the same window. Using your masking technique of choice, isolate your left side making sure you get rid of that camera in front of your face! I would strongly suggest using layer masks so that if you make a mistake you can recover more easily. Layer masks are one of the smartest ways to work in Photoshop and if you haven’t added it to your skill set, do yourself a favor and learn how to do it!

Step Five
Continue masking for your opposing side exactly the way your did the former. This would be a good time to step back and see how everything is lining up. Is the collar of your shirt lining up? How about the bottom of your shirt? Double check the background too. If not, clean them up using whatever means necessary. The clone tool would be a good companion here- just make sure you always clone on a separate layer!

Step Six
Now it’s time to place your head into the mix. This step can be the easiest step, but it can also be the most painstaking. Sometimes you can get away with using a soft edge brush on your previous layer masks while other times you’ll need to mask out your entire head. If you’ve got a chrome-dome, then lucky you, but if you have a long mane of hair, you’ll have some work cut out for you. Clone/mask where you need to get everything lined up and finalized.

Step Seven
Finally, you should do some last minute checking to see if everything looks good. Then you can go ahead and pat yourself on the back and add in some layer adjustments to get the overall levels and color looking good.

You should have a good looking manipulation going on by now, so at this point go ahead and save it and set it as your Myspace/Facebook/whatever photo and let your friends ask how you did it. Feel free to link them here, or just leave them in suspense and not reveal our little secret.
November 21, 2008: Re-blogged on ddvip.
January 24, 2012: Reached the frontpage of Reddit via r/Pics.
April 6, 2012: Mentioned on Expert Photography (which was then linked from Daily Mail).
April 9, 2012: Featured on Gizmodo.
February 2, 2014: Reached the frontpage of Imgur.
